PEPPER GROWING TIPS
Starting
peppers from seed, pepper seed germination, and growing hot peppers.
The following
are twenty four pages about starting pepper seeds, tests
of different potting soils, planting, days to germinate, fertilizers,
using bone meal, pepper plant sizes, pepper seed cleaning and
the proper methods of pepper seed storage to maintain viability,
acquired from five decades of experience in the seed industry.
Redwood
City Seed Company, Box 361,
Redwood City, California 94064.
Craig and Sue Dremann (650) 325-7333.
Get a printed copy of our seed catalog in the mail
here.
Craig's
pepper plant Rule of Thumb--"If
your Super-Hot plants are
not six feet tall by mid-August, you are not fertilizing them
with
enough bone meal and liquid fish!"
WEB SITE CONTENTS:
--Growing tips, the plastic pot method.
--Never use peat pots, peat pellets, etc.
--Tests to find the best pepper seed starting soil.
--Top ten things to do, when starting pepper seeds.
--Planting the seeds.
--Air circulation.
--Keeping the seeds warm to germinate.
--Germination times for each variety.
--Fertilizers, bone meal.
--Transplanting peppers.
--Spacing in the garden.
--Container plants.
--Time to produce fruit.
--Plants make flowers but no fruit.
--Growing peppers in Florida in the summer?
--Mature plant sizes for each pepper variety.
--How many fruit per plant.
--Pepper seed cleaning.
--Pepper seed storage.
--Seed counts.
--Seed harvesting and selection tips.
--Pepper seed testing.
--Drying peppers to preserve their heat levels.
--Remember--all peppers are perennials.
Copyright © 2003-2020 by Craig & Sue Dremann and cannot
be reprinted or put on any web site, without written permission.
Anyone lifting any text
or images without permission, agrees to pay on demand, liquidated
damages of $100 per day, per sentence or image.
Printed
out, this website is 24 pages long.
Growing
tips, the four to eight inch diameter plastic pot method
REQUIREMENTS:
--Potting soil, Supersoil® Potting Soil (a Scotts Miracle-Gro brand) via Walmart
or Home Depot. ALSO GOOD: Pure Coconut Coir, Fox Farm Ocean-Forest,
Miracle Gro Nature's Care, and Miracle Gro Performance Organic.:
--NOT recommended
--
peat
pellets, peat pots, or potting soil that is mostly peat.
--One plastic pot per variety, 4 to 8 inches in diameter.
--Soil thermometer or Taylor brand indoor-outdoor thermometer
with wire sensor (not wireless).
--Pepper seeds.
--Some way to keep the soil at the required 80-85°F daytime soil temp.like an electric
heating pad.
--Plastic labels or waterproof marker to label pots.
--Distilled water.
--Miracle-Gro® "Bloom Booster" or Peters Professional
"Super Blossom"
--Once seedlings are up, a light source, either a window or grow-lights.
Make a "Seed
starter solution" of either the Miracle-Gro® or Peters
Professional, mixing only one tablespoon in a gallon of distilled
water.
Also, do not use bleach on your pepper seeds and never
refrigerate your seeds while trying to get them to germinate!
Seeds can be dunked
in hydrogen peroxide
in a sieve or strainer for one minute and then rinsed in water
at planting time. This
hydrogen peroxide treatment can be important for seeds that have
a lot of nooks and crannies, like the Manzanos. Hydrogen peroxide
will take any mold spores off the seed surface, and will not damage
the seed, like bleach sometimes can.
Start with the plastic pots and fill them with potting soil
and sprinkle with the starter-fertilizer solution to settle soil.
Plant seeds, spacing 1/2" apart, and cover with no more than
1/8" of additional potting soil. Water again with the Seed
starter solution, and use the solution instead of tap water, whenever
the containers need to be re-watered. Do not use tap water
or well-water on very young seedlings., because the chlorine or
minerals may damage the seedlings.l.
Once seedlings are
a few inches tall, transplant seedlings into their own individual
3" or 4" pots, and let plants grow to 6-8" tall.
Work about a tablespoon
of bonemeal into the potting soil of each 3-4" pots before
you transplant the seedlings into them.
And once transplanted
into their own individual pot, start watering with an organic
fertilizer, like Alaska brand liquid Fish fertilizer. Do not continue
to use the Miracle-gro® or Peters Professional once the seedlings
are up.
Plant seedlings out
into the garden, when nights are consistently about 50
NEVER, NEVER,
NEVER ever use peat pots, peat pellets, or potting soil that is
mostly peat.
Everyone always asks
"Why??" ---We don't know why---Perhaps the peat is too
acidic, or that there is something in peat that inhibits
pepper seed germination.
All we know, is that whenever anyone has
had problems with pepper seed germination, when the seeds are
known to have good germination after testing them on top of moist
sterile cotton--part of the problem has always been peat pellets,
or potting soil that was mostly peat.
TOP TEN THINGS TO DO - STARTING PEPPER SEEDS:
1.) Never ever, ever, ever use peat pellets, peat pots, or potting soil
that is mostly peat.
If you have to use a seedling mix with peat, dilute it with 25-30%
perlite.
2.) Always give 80-85°F daytime
soil temp., and keep at room temp. at night. Do not refrigerate
while germinating! Always
check to see that soil temperature you are getting 80-85°F with
a soil thermometer.
3.) Always use a soil thermometer or Taylor brand indoor-outdoor
thermometer with the outdoor sensor on a long wire, and put the
outdoor sensor in the soil. The indoor-outdoor thermometer will
measure down to 1/10th of a degree.
.
4.) Always use an organic fertilizer on older seedlings.
5.) Never plant seeds more than 1/4 inch deep.
6.) Always let the soil surface dry very slightly before re-watering.
7.) Always use the Seed starting solution on all hot peppers,
especially useful for the slower-germinating kinds, like the Pequin,
Tepin, and Bhut Jolokia.
8.) Never, ever use table salt and we do not recommend
using bleach or Epson salts (Magnesium
sulfate). You can, however, use a Hydrogen peroxide rinse at
planting time.
9.) Do not add organic materials that may have a lot of fungi
spores, to your seed
starting soil, like cow or horse manures, bat guano, garden soil,
worm castings, or compost. However, chicken manure, blood meal,
fish fertilizer, bone meal and other more sterile materials can
be used, and will not add fungi that can kill your seedlings.
10.) Don't give up!--some hot peppers take almost a month
to germinate (see details below).A rule of thumb is, the
hotter the pepper, the longer it takes to germinate sometimes.
PLANTING
the seeds.
Plant pepper seeds, spacing
them 1/2" (one cm.) apart in each direction and no more than
1/4" (6 mm) deep.
Keep containers 80-85°F (30°C) during the day and 60-70°F
(20°C) at night.
Make a hole in the clear plastic top for the thermometer to
go through. For a few hours each day, take the cover off the container
in the afternoon to let air in. This will help control "damping
off" fungus, which is a disease which attacks the seedlings
and makes them topple over.
To water without disturbing the seedlings, with the holes
punched in the bottom of the container, you can water or rewater
by letting the container sit in a bowl of water and soak up the
water through the bottom holes. Make sure that the soil level
is above the level of the water when the container
is soaking up water.
Otherwise, watering should
be done overhead with
a gentle sprinkling can, and water thoroughly every time, but
let the surface dry out a little bit between watering. That helps
keep the damping off fungus spores from developing and eating
your seedling for breakfast.
AIR
CIRCULATION
Pepper seedlings need
some air circulation, at least until they develop their second
set of leaves, and a small fan can help circulate the air, to
control any damping off fungus.
KEEP
the SEEDS WARM to germinate:
There are at
least three inexpensive methods to provide the 80-85°F (25-30°C.) soil temperatures that pepper seeds love for
germination---
1.) HEATING PAD method
from the pharmacy. Purchase
one that can get wet and put it under the flats or pots that your
pepper seeds have been sown in. We caution using commercial
seedling heating mats, make sure and check the soil temperature,
that they are warming the soil enough. Also, we do not recommend
soil heating cables, because you have to put them into sand
beds, and can't just put them directly underneath pots.
2.) LIGHT BULB
in the cardboard box method.
You need a cardboard box approximately 2 x3 x3 feet (0.6 x 1 x
1 meter), a ceramic light socket, lamp cord long enough to go
from a wall socket and where you will have your germination box
set up, an electrical plug, a 40 watt utility light. Place box
on its side and bolt ceramic socket to the inside of the box about
half-way up on either the left or right side. Keep light on during
the day, but turn off at night to allow seedlings to return to
room temperature. A 40 watt light will keep the inside of the
box at 80-85°F (25-30°C.).
3.) THE HIGH SHELF
in a heated room. The 80-85°F daytime soil
temps for peppers only
have to be maintained until the leaves break the soil surface,
and then seedlings can be moved to a cooler place with abundant
light. If you check high shelves near the ceiling, you might find
one where the heat in the room keeps the temp. at the right level
during the day. You just need to make sure and keep the seed pots
adequately moist, and never allowed to dry out, which may be watering
once or twice a day.
GERMINATION
SPEED--Regular sweet peppers
are very quick to germinate, usually 6-8 days.
HOT PEPPERS always take a lot longer, a minimum of
15 days, but up to 100 days!
--Habaneros always take a minimum of 18-25 days.
--Bhut Jolokia and Trinidad Scorpions and the other Super-Hots
take a minimum of 20-30 days.
--East Indian and Thai hot peppers always take 20-55 days.
--Bird peppers like Pequin and Tepin have hard seed coats and
are always the longest: minimum of 21 and up to 100 days. Daytime
soil temperature of 80-85°F and fertilizers will cut the total
germination time down to 25-30 days.
See the next section
of this web page, to get details on specific peppers.
GERMINATION
TIMES for each
variety. This chart lists how many days until you get 25% germination,
and how many days to achieve 50% germination, then the total number
of days that seed will take to finish germinating. Chart data
is from our own tests.
First part of
this chart is sorted by variety name, and second part, the peppers are grouped
together based on the number of days it takes to achieve 50%
germination, using 80-85°F daytime soil temperatures.
|
Variety |
Days 25% |
Days 50% |
Days finish |
| Aconcagua |
10 |
11 |
15 |
| Aji Yellow |
11 |
15 |
20 |
| Anaheim |
10 |
14 |
20 |
| Ancho |
11 |
11 |
20 |
| Assam |
8 |
15 |
20 |
| Banana |
7 |
10 |
15 |
| Bangalore Torpedo |
10 |
12 |
15 |
| Bhut Jolokia, regular |
17 |
25 |
30 |
| Bhut Jolokia Craig's |
12 |
15 |
21 |
| Bishops Cap |
10 |
12 |
15 |
| California Mild |
12 |
14 |
20 |
| Cascabel |
17 |
17 |
17 |
| Caloro |
12 |
14 |
21 |
| Catarina |
8 |
11 |
20 |
| Cayenne Long Slim |
6 |
8 |
11 |
| Cherry Hot |
8 |
11 |
29 |
| Chimayo |
7 |
9 |
11 |
| Cobra |
11 |
14 |
20 |
| Costeno Rojo |
14 |
20 |
28 |
| De Arbol |
17 |
18 |
18 |
| Dulcetta |
15 |
15 |
15 |
| Elephants Trunk |
11 |
11 |
11 |
| Fresno |
11 |
11 |
11 |
| Guajillo |
12 |
13 |
14 to 22 |
| Hab. Paper Lantern |
11 |
11 |
47 |
| Habanero Mustard |
11 |
11 |
15 |
| Hab. White Bullet® |
11 |
11 |
15 |
| Hung. Yellow Wax |
12 |
15 |
28 |
| Jalapeno M |
11 |
11 |
20 |
| Jalapeno TAM |
11 |
11 |
11 |
| Jalapeno Early |
10 |
10 |
10 |
| Japones |
11 |
13 |
24 |
| Joe E. Parker |
11 |
15 |
20 |
| Kurnool |
11 |
15 |
20 |
| Manzano Orange |
11 |
15 |
28 |
| Manzano Red |
12 |
12 |
14 |
| Manzano Yellow |
15 |
15 |
15 |
| Marconi Red |
10 |
12 |
30 |
| Mex. Negro, Chilaca |
11 |
11 |
20 |
| NM 6-4L |
11 |
15 |
15 |
| NM Big Jim |
11 |
15 |
20 |
| NM Improved |
11 |
15 |
15 |
| Onza Amarillo |
17 |
17 |
22 |
| Pequin |
24 |
26 |
35 |
| Portugal |
11 |
11 |
15 |
| Pueblo |
11 |
15 |
20 |
| Punjab Small Hot |
11 |
11 |
15 |
| Puya |
11 |
11 |
12 |
| Sandia |
11 |
15 |
20 |
| Santa Fe Grande |
11 |
15 |
20 |
| SB Caribbean Red |
10 |
11 |
11 to 47 |
| Scotch Bonnet Fatali |
11 |
11 |
20 |
| Serrano |
11 |
15 |
20 |
| Squash Jam. Red |
11 |
11 |
15 |
| Squash Jam. Yellow |
11 |
15 |
20 |
| Sudanese |
15 |
20 |
28 |
| Sw. Wrink. Old Man |
11 |
11 |
15 |
| Tabasco |
15 |
15 |
20 |
| Tepin |
18 |
21 |
31 |
| Thai Bangkok |
11 |
11 |
20 |
| Thai Large |
11 |
11 |
15 |
| Zimbabwe Bird |
11 |
15 |
15 |
|
|
|
|
SORTED BY
SPEED
TO 50%
GERMINATION |
|
|
|
|
Variety |
Days 25% |
Days 50% |
Days finished |
|
SUPER SPEEDY |
|
|
|
| Cayenne Long Slim |
6 |
8 |
11 |
| Chimayo |
7 |
9 |
11 |
| Banana sweet |
7 |
10 |
15 |
| Jalapeno Early |
10 |
10 |
10 |
|
QUICK to sprout |
|
|
|
| Aconcagua |
10 |
11 |
15 |
| Ancho |
11 |
11 |
20 |
| Catarina |
8 |
11 |
20 |
| Cherry Hot |
8 |
11 |
29 |
| Elephants Trunk |
11 |
11 |
11 |
| Fresno |
11 |
11 |
11 |
| Habanero Paper Lantern |
11 |
11 |
47 |
| Habanero Mustard |
11 |
11 |
15 |
| Habanero White Bullet® |
11 |
11 |
15 |
| Jalapeño M |
11 |
11 |
20 |
| Jalapeño TAM |
11 |
11 |
11 |
| Pasilla, Chilaca |
11 |
11 |
20 |
| Portugal |
11 |
11 |
15 |
| Punjab Sm. Hot |
11 |
11 |
15 |
| Puya |
11 |
11 |
12 |
| SB Carib Red |
10 |
11 |
11 to 47 |
| SB Fatali |
11 |
11 |
20 |
| Squash Jam. Red |
11 |
11 |
15 |
| Sw. Wrink. OM |
11 |
11 |
15 |
| Thai Bangkok |
11 |
11 |
20 |
| Thai Large |
11 |
11 |
15 |
| Bangalore Torpedo |
10 |
12 |
15 |
| Bishops Cap |
10 |
12 |
15 |
| Manzano. Red |
12 |
12 |
14 |
| Marconi Red |
10 |
12 |
30 |
|
MEDIUM SPEED |
|
|
|
| Guajillo |
12 |
13 |
14 to 22 |
| Japones |
11 |
13 |
24 |
| Anaheim |
10 |
14 |
20 |
| California Mild |
12 |
14 |
20 |
| Caloro |
12 |
14 |
21 |
| Cobra |
11 |
14 |
20 |
| Aji Yellow |
11 |
15 |
20 |
| Assam |
8 |
15 |
20 |
| Bhut Jolokia Craig's |
12 |
15 |
21 |
| Dulcetta |
15 |
15 |
15 |
| Hungarian Yellow Wax |
12 |
15 |
28 |
| Joe E. Parker |
11 |
15 |
20 |
| Kurnool |
11 |
15 |
20 |
| Manzano Orange |
11 |
15 |
28 |
| Manzano Yellow |
15 |
15 |
15 |
| NM 6-4L |
11 |
15 |
15 |
| NM Big Jim |
11 |
15 |
20 |
| NM Improved |
11 |
15 |
15 |
| Pueblo |
11 |
15 |
20 |
| Sandia |
11 |
15 |
20 |
| Santa Fe Grande |
11 |
15 |
20 |
| Serrano |
11 |
15 |
20 |
| Squash Yellow. |
11 |
15 |
20 |
| Tabasco |
15 |
15 |
20 |
| Zimbabwe Bird |
11 |
15 |
15 |
|
SLOW to germinate |
|
|
|
| Cascabel |
17 |
17 |
17 |
| Onza Amarillo. |
17 |
17 |
22 |
| De Arbol |
17 |
18 |
18 |
| Costeno Rojo |
14 |
20 |
28 |
| Sudanese |
15 |
20 |
28 |
|
VERY SLOW |
|
|
|
| Tepin |
18 |
21 |
31 |
| Bhut Jolokia, regular |
17 |
25 |
30 |
| Pequin |
24 |
26 |
35 |
USE
THE SUPER SPEEDY peppers as checks for potting soil and temps. Use a packet of Jalapeño
Early or Banana sweet, and plant them at the same time as your
other pepper seeds. If your soil mix has problems, or your soil
temps. are not correct, you will know within 10 days with either
of those varieties.
GIVE
THEM SOME LIGHT
Once seedlings appear, put in a sunny place or under grow-light
to give them adequate light so they do not get leggy and too thin.
Transplant seedlings into
individual 3" (8 cm) diameter pots with potting soil as soon
as they can be handled, and let grow in those containers until
strong. Plant young plants outside when night time temperatures
consistently are above 50°F (10°C).
FERTILIZERS: Watering pepper seeds with
a fertilizer solution, helps speed seed germination, by breaking
a natural dormancy that is naturally in some pepper seeds.
When seedlings appear, we only recommend using diluted fish fertilizer
(available in a bottle at the garden store). The fish fertilizer can be fed frequently,
and never burns. We usually feed our plants every 3 weeks during
the growing season until they start to flower.
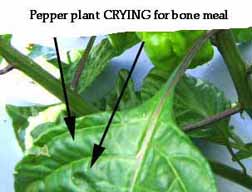
Habaneros,
Scotch bonnets, Trinidads and the other Super-Hots absolutely will need calcium many times
during the growing season, in the form of bonemeal, a few Tablespoon
per plant. Scatter the
bonemeal around each plant, and water in. You can tell when
you need calcium if the plants stop growing and if young leaves
start to pucker---they are running out of calcium to build
new leaves.
BONEMEAL is available at any hardware store, and
if they do not have it on the shelf, they can easily order it
for you. Bone meal is usually used for roses, and give each plant
a sprinkle of bone meal every 2-4 weeks during the growing season.
We use 4 pounds for 100 plants
each time we fertilize. This is such a critical fertilizer for
hot pepper plants, especially the habaneros and Scotch bonnets,
and you can see below how they look when they start suffering
without it:
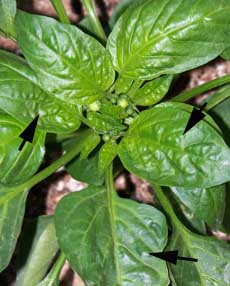
Severe need for bonemeal, needed by pepper plants. Leaves should
be flat between the veins. When these plants were fertilized,
within a week, they grew another foot and the leaves flattened
out.
DROOPY
SEEDLINGS?
Do the seedlings come up, and then suddenly droop and die?
That's called "damping off" fungus, which grows
on the soil surface when it is kept too wet, and when there's
not adequate air circulation. Keep the potting soil on the dry-side,
always give good air circulation, and always let the very top
surface of the soil dry out before re-watering the seedlings.
Do
not add materials to your pepper seed starting soil that may have a lot of fungi
spores, like garden soil,
cow or horse manures, bat guano, worm castings, or compost.
What can be added are--Chicken
manure, blood meal, fish fertilizer, bone meal that will not add
fungi that can kill your seedlings.
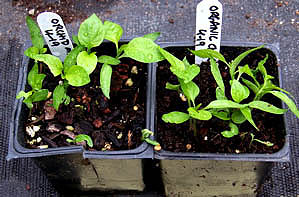
Seedlings at the perfect transplant
size.
TRANSPLANTING
PEPPERS: The picture above shows when peppers
are the perfect transplant size. Take a fork and carefully dig
out each plant and separate them, and plant them into their own
individual 3 inch diameter or 4 inch diameter pot, where you have
mixed a few tablespoons of bone meal and blood meal into the potting
soil beforehand. Label each seedling.
Then water the seedlings with
a mix of one gallon of water with one cup of Alaska brand liquid
fish fertilizer. Allow the seedlings to grow in these pots until
they are 6-8 inches tall, then they will be a good size to plant
into the garden.
When you plant your seedlings
into the garden, dig a hole for each seedling, and throw in a
hand full of bone meal and a hand full of blood meal, and mix
those fertilizers with the soil at the bottom of the hole. Then
water with liquid fish, with one cup mixed into one gallon of
water. Try to plant in the evening, so the seedlings have the
night to get adjusted to their new home. If they wilt during the
day, keep a fine mist on them during the day, until they stop
wilting.

An old, untrellised Manzano red pepper plant, about 10 feet wide
and 30 feet long. See the tennis-ball sized red fruit to get an
idea of the size of the plant.
SPACING
IN THE GARDEN: Sweet peppers are usually dwarf, so
can be packing in at about 1.5 feet apart. Most hot peppers need
about 2-3 feet.
The sprawling Manzanos or Rocotos
(Capsicum pubescens) is unusually large, needing 3-4 feet, but in Florida, Hawaii and Coastal
Southern California they are perennial vine-like plants that can
be trellised like grapes, growing multiple stems from the roots,
each growing to 15 feet long. The Manzanos when 3-4 years
old, and when they are trellised, can produce hundreds of pounds
of fruit per plant.
CONTAINER
PLANTS. All peppers are
perennials and can be grown in 2 or 3 or 5 gallon containers of
potting soil year-round. Just bring in the plants when the nights
drop below 50°F., and put them back outside when the nights
are consistently above 50°F .
TIME
TO PRODUCE FRUIT---Once your pepper plants are out in the
garden, how long will it take them to produce? Green, unripe fruit
is generally produced in 55-75 days after setting plants out into
the garden, and red-ripe fruit is 90-150 days.
There are exceptions to that
rule, like the Chimayo hot pepper from the high mountains of New
Mexico, that starts flowering as a four-inch tall seedling, and
will produce fruit in 30 days!
PLANTS
MAKE FLOWERS BUT NO FRUIT?
Most hot peppers and some
sweet peppers require insect pollination to form fruit. If the proper insect is absent, or if
the local insects are not attracted to your pepper flowers, you
may see the plants flower, drop off and never set fruit. This
is especially true for the blue-flowered Capsicum pubescens,
the Manzanos or Rocotos, or hot peppers grown in a greenhouse.
Pollen is produced on the stamens
by the anthers, and usually
ripens between noon and 3 PM every day.
To hand
pollinate, take a moistened water-color paint brush,
and pick up some pollen on your brush
and transfer it to the other flower centers. You can get close
to 100% fruit set with hand pollination.
GROWING
PEPPERS IN FLORIDA IN THE SUMMER?
Formerly thought to be impossible, but can be successfully done,
with these three changes.
1.) Always grow plants in
the shade.
2.) Always feed once a month
with bone meal. We use five pound for every 50 plants.
3.) May be best to grow
in pots, rather than the ground, so you can move them around
to find the best spot in the garden.
And the potting soil for the
pots to grow peppers in the summer in Florida, should be a layer-cake,
with 1/3 on the bottom a 50:50 mix of perlite Miracle Gro®
Orchid Mix. Then for the 2/3rds top part, you make up a 50:50
mix of the Miracle Gro® Organic Choice and their Orchid Mix,
with a cup of bone meal and a cup of blood meal mixed in thoroughly
for each 12-inch diameter pot.
By using potting soil, making
a well-drained mix, and keeping the plants in the shade, you should
avoid all the problems of growing peppers in the summer in Florida.
My aunt grows wonderful peppers
in summer in Fort Myers in the shade, so you should be able to
also.
Mature plant sizes
for each pepper variety:
Variety..............Height...Width
Aji Rojo................2 feet...3
feet
Aji Yellow..............4 feet...4 feet
Anaheim.................2 feet...1.5 feet
Andra...................3 feet...1 foot
Bangalore Torpedo.......3 feet...2 feet
Bhavnagari Long.........3 feet...1 foot
Bhut Jolokia............6 feet...3 feet
Bishops Cap Red.........2 feet...4 feet
Cascabel................2 feet...1 foot
Catarina................2 feet...2 feet
Cayenne Long Slim.......2 feet...4 feet
Cherry Large Hot........2-3 ft...2 feet
Cobra...................4 feet...2-3 feet
Cubanelle...............2 feet...4 feet
Dagger Pod..............2 feet...4 feet
De Arbol................4 feet...4 feet
Espanola................2-3 ft...2 feet
Fresno..................2 feet...2 feet
Guajillo................3-4 ft...3 feet
Habanero Chocolate......3 feet...4 feet
Habanero Mustard........4 feet...3 feet
Hab. Orange Craig's 3X..3 feet...4 feet
Habanero Paper Lantern..2 feet...3 feet
Habanero White Bullet®..2-3 ft...4 feet
Hungarian Yellow Wax....1 foot...3 feet
Jalapeño Early Hot......16 in....20 inches
Jalapeño Grande Craig's.2 feet...3 feet
Jalapeño Mild M.........2 feet...2 feet
Joe E. Parker...........2-3 ft...1.5-2 feet
Kurnool.................3 feet...3 feet
Manzanos, any color.....6-8 ft...15 feet or more
Mayan Cobanero Love.....2-4 ft...3-10 feet
Mulato..................2 feet...2 feet
Nanded..................4 feet...3 feet
Numex Big Jim...........2 feet...1 foot
Onza Rojo...............2 feet...1 foot
Pequin..................4 feet...3 feet
Portugal Hot............1.5 ft...1 foot
Pubjab Small Hot........4 feet...3 feet
Puya....................3-4 ft...3 feet
Sandia..................2 feet...1.5 feet
SB Caribbean Red........2 feet...2 feet
Scotch Bonnet Fatali....2.5 ft...3 feet
Serrano.................3 feet...4 feet
Squash Jamaican Red.....2 feet...2.5-4 feet
Squash Jamaican Yellow..2-3 ft...1 foot
Squash Red 5-in-1.......2 feet...2 feet
Sudanese................2-3 ft...1 foot
Sweet Wrinkled Old Man..2 feet...3-4 feet
Tabasco.................3-4 ft...2-3 feet
Tepin...................3 feet...4 feet
Thai Bangkok Upright....3 feet...6-8 inches
Twilight................2 feet...4 feet
Zimbabwe Bird...........8-12 in..1-2 feet
SORTED BY HEIGHT
Zimbabwe Bird...........8-12 in..1-2
feet
Hungarian Yellow Wax....1 foot...3 feet
Jalapeño Early Hot......16 in....20 inches
Portugal Hot............1.5 ft...1 foot
Squash Jamaican Yellow..2-3 ft...1 foot
Sudanese................2-3 ft...1 foot
Cascabel................2 feet...1 foot
Numex Big Jim...........2 feet...1 foot
Onza Rojo...............2 feet...1 foot
Joe E. Parker...........2-3 ft...1.5-2 feet
Anaheim.................2 feet...1.5 feet
Sandia..................2 feet...1.5 feet
Cherry Large Hot........2-3 ft...2 feet
Espanola................2-3 ft...2 feet
Catarina................2 feet...2 feet
Fresno..................2 feet...2 feet
Jalapeño Mild M.........2 feet...2 feet
Malagueta Craig's.......2 feet...2 feet
Mulato..................2 feet...2 feet
SB Caribbean Red........2 feet...2 feet
Squash Red 5-in-1.......2 feet...2 feet
Squash Jamaican Red.....2 feet...2.5-4 feet
Sweet Wrinkled Old Man..2 feet...3-4 feet
Aji Rojo................2 feet...3 feet
Habanero Paper Lantern..2 feet...3 feet
Jalapeño Grande Craig's.2 feet...3 feet
Bishops Cap Red.........2 feet...4 feet
Cayenne Long Slim.......2 feet...4 feet
Cubanelle...............2 feet...4 feet
Dagger Pod..............2 feet...4 feet
Twilight................2 feet...4 feet
Habanero White Bullet®..2-3 ft...4 feet
Mayan Cobanero Love.....2-4 ft...3-10 feet
Scotch Bonnet Fatali....2.5 ft...3 feet
Guajillo................3-4 ft...3 feet
Puya....................3-4 ft...3 feet
Tabasco.................3-4 ft...2-3 feet
Thai Bangkok Upright....3 feet...6-8 inches
Andra...................3 feet...1 foot
Bhavnagari Long.........3 feet...1 foot
Bangalore Torpedo.......3 feet...2 feet
Kurnool.................3 feet...3 feet
Habanero Chocolate......3 feet...4 feet
Hab. Orange Craig's 3X..3 feet...4 feet
Serrano.................3 feet...4 feet
Tepin...................3 feet...4 feet
Aji Yellow..............4 feet...4 feet
Cobra...................4 feet...2-3 feet
De Arbol................4 feet...4 feet
Habanero Mustard........4 feet...3 feet
Nanded..................4 feet...3 feet
Pequin..................4 feet...3 feet
Bhut Jolokia or Ghost...6 feet...3 feet
Manzanos, any color.....6-8 ft...up to 15 feet long vines.
HOW MANY FRUIT will each pepper plant produce? The yields
vary according to variety, but here's some examples of high yielders
that we've measured, number of fruit per plant:
Cherry Large Hot-------50-100
Espanola------------------100
Fresno--------------------100
Tabasco---------------400-500
Bhut Jolokia or Ghost---1,000
White Bullet® Habanero--1,000
Tepín-------------1,000-1,500
Manzanos when 3 years old - 500 to 1,000 pounds of fruit/plant.
Pepper
Seed Cleaning.
NEVER,
EVER DRY your
fresh peppers fruit first,
before you removing the seeds, if you want to have the best quality
seeds for planting. The
moisture that is inside the pepper pod, especially the thicker
podded varieties like Ancho, Jalapeño, Serrano, etc. can
damage the seed quality as the pod dries.
USE
FRESH-RIPE FRUIT FOR SEED,
and scrape the seeds out of the fully-ripe fresh pods. Dry the seeds in the sun for a few days,
taking them indoors at night. Or dry the seeds near a heater on
a paper plate. If you have several varieties, write the names
of each pepper on the paper plates.
Always wear rubber gloves, if you are working with hot peppers! If you are working with only a few peppers,
just take a sharp knife and cut them in half, and scrape out the
seeds. I usually rub the seeds over a 1/4 inch mesh screen to
remove any flesh that may still be attached to the seeds, and
push the seeds through the screen, usually leaving any of the
pepper flesh behind.
Buy a good
mask, if you are cleaning a lot of peppers. We use a 3M 8210 or even better is
the 3M 8247 which has activated charcoal on the surface, which
traps the pepper fumes, so you will not breathe them in.
Also, use a
blender if you are working with a lot of peppers. The
rule-of-thumb is that it takes 50-200 pounds of fresh peppers
to make one pound of cleaned seeds. Cut off the stems (calyx)
and cut the peppers in half.
Add peppers to fill the blender
about 1/3 full, and then
add water until the blender is 3/4 full. Blend just a few seconds
to break up the pods. When you stop the blender, the pepper pulp
will float to the top along with the immature seeds, and the viable
seeds for future planting will sink.
If a substantial amount of
the seeds are still mixed with the blended pulp, then dump the pulp into a five gallon
bucket, a total of only 1-1.5 gallons and add water to the top,
let sit for 30 minutes to let the good seeds settle, and carefully
pour off the pulp. The good seeds should be all at the bottom
of the bucket. Continue to keep adding water and pouring off the
pulp until you get clean seeds.
You can drain off the floating
pulp from the bucket, and use it for salsa,
freeze it, etc. Add more water to make any remaining pulp float,
and skim that off, then pour the seeds into a strainer, and dump
seeds onto a paper plate with several layers of paper towel on
the plate, for drying. Make the layer of seeds on the plate only
1-2 seeds deep, and put out in the sun to dry. Replace the paper
towel once, after the first hour, and stir every hour. Check the
moisture of the paper towel to see how dry the seed really is.
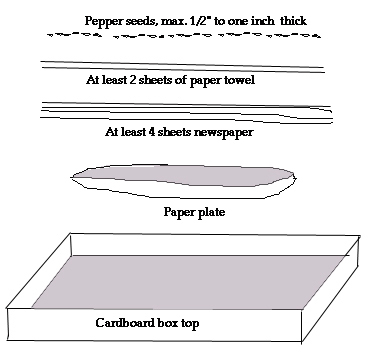
For larger quantities of seeds,
like pounds, pour seeds
from the bucket into the strainer and let drain for 20-30 minutes,
then pour into a box top lined with at least four, and from 10-15
sheets of newspaper with a couple of layers of paper towel on
top, and put in the sun to dry.
Change the newspaper and paper
towel after the first hour of drying,
then every day thereafter. Arrange the seeds in furrows, about
1" apart, and recut the furrows every hour the first day
of drying, then several times a day thereafter.
Check the moistness of the
newspapers underneath
the seeds, to indicate when fully dry. Then store in manila envelopes
for a few weeks at room temp indoors, before putting into plastic
bags or jars for long-term storage.
If you are cutting or blending
a lot of hot peppers, buy a 3M "8210 N95" or 3M 8247
respirator at the hardware
store, because it will save your lungs for your old age. Don't
rely on one of those paint or dust masks. For hot peppers you
need the NIOSH approved one with the sponge rubber around the
nose.
Pepper
Seed Storage:
Most peppers will only keep
their viability at room temperature for 3-4 years. The exception is the Capsicum pubescens
group of Manzano and Rocoto peppers which have black seeds and
thicker seed coats, and can last 4-6 years.
There's several ways to keep your pepper seeds longer--but
first I'll list the fastest ways to kill your peppers seeds:
TOP
3 FASTEST WAYS TO KILL PEPPER SEEDS:
1.) Store
them at room temp. in any
of the following places:
(a.) Near the floor or less than 4 feet off the floor (where moisture condenses).
(b.) In an unheated building or outside (shed, garage etc.)---no
moisture control.
(c.) In a cupboard or drawer--doesn't get good air circulation.
2.) If
storing seed refrigerated in a jar or a plastic zip lock ("Hefty") bag, do not open
the container before the seeds reach room temp. when they are
still cold, because moisture can condense on seeds.
3.) Store them in plastic or a glass jar, and you don't have a way
to tell if there is moisture still in the seed,
at least add a strip of newsprint or a ULINE 10-60% humidity strip.
.
BEST
WAYS TO STORE PEPPER SEEDS
Jars or plastic zip lock in
the refrigerator, never at room temp..
I personally like the
Hefty brand freezer bag, which is very easy to get, or even better
is the Ziploc® brand Vacuum Freezer bags which can
be purchased online or at larger grocery stores.
Check moisture in seeds. Jars or plastic bags are great for storing
pepper seeds in the refrigerator, but you need to put at least
a slip of newspaper in with the seeds, as a moisture indicator.
If you pull out the newspaper, and it is not crispy-dry, you need to
dump out both the newspaper and the seeds out onto a paper plate
to dry in the sun, to drive off excess moisture. Or you can purchase
some "indicator silica gel", and put that in
with your seeds to absorb any moisture.
Bulk indicator
silica gel is sold at
crafts shops, to dry flowers, called Flower Drying Crystals. We take a few tablespoons of the gel
and put it into a paper packet, like a #3 or #4 coin envelope,
that you can buy at a stationery store. Then fold the flap but
do not seal, just close with a paper clip. Check the gel periodically,
and is will change from dark blue to pink when it has absorbed
moisture.
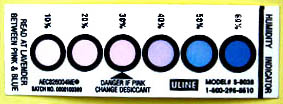
Uline Humidity strip, about life sized
Adding an
indicator humidity strip,
a UNLINE 10-60% is extremely useful,
and it takes the place of the newspaper strip. The Uline strip
changes color to indicate the moisture level in your seeds.
Always label
and date your seed stocks.
You should always store pepper seeds in jars or Freezer zip locks and always keep them refrigerated
(not frozen) and not at room temperature.
When you are ready to use your
stored seeds, always take the jar or ziplock out of the refrigerator
a few hours before you are going to plant, to let the seeds inside
warm up to room temperature, before you open the jar or bag.
By refrigerating your pepper
seeds, you can keep them
viable for at least five years, and maybe ten years or longer.
In 2009 we planted some seeds
stored in the refrigerator for 21 years, and still got excellent
germination. Do
not freeze pepper seeds, just refrigerate.
SEED HARVESTING
AND SELECTION TIPS
By saving your own seeds from
your peppers, you could develop an even better variety than you
could commercially purchase. The first rule of pepper selection,
is to harvest seed from the first fruit crop produced and from
only the largest fruit.
Then, you might take a look
at maximum fruit production per plant, plant height, or in pimentos,
enough leaf cover to protect the fruit from sunburn, for example.
Or look for unusual fruit colors or shapes to reproduce.
By saving seed from the first
crop and the largest fruit, you can select for a plant that ripens
earlier, and produces larger fruit. If you save from later crops,
you may end up selecting for later and later maturing plants.
If you are saving for the hotter
and hotter fruits, you
need to take a sample fruit from each plant and assay them for
their heat levels, and do the Dremann Hotness Scale test
in your kitchen. You will need a scale that can weigh in grams,
a blender, and a baby's graduated medicine dropper from the pharmacy.
Details of the test method is free
on the web.
PEPPER SEED TESTING
If you have stored
pepper seeds, it is a good idea to test them a month or two before
planting season, to see what the current germination rate is.
You are going to need some large
cotton balls, a permanent marker, bottled water, a bowl and plate,
tweezers, plus a sheet of paper and a pen to record your tests.
Get some large cotton balls from
the cosmetics department of the drug store or grocery store. Put
them in a bowl and find a plate that is the right size to cover
the bowl. If the plate is clear glass, that is best, or buy one
from the hardware store for that purpose.
Flatten out the cotton balls,
and if you are going to test more than one batch of pepper seeds,
use a ballpoint pen or permanent marker to put a number on the
edge of each cotton ball to identify them.
Then put bottled water (not tap
water) in the bowl, and moisten the cotton and drain. Do not press
the moisture out of the cotton, just let it drain out naturally.
Cotton balls can be touching or have spaces between them.
Then use one cotton ball per variety,
and using tweezers, place 10-20 seeds on each cotton ball, and
space seeds evenly apart. Make a record of your test on a sheet
of paper,that will look like this:
1.) Anaheim - test starts 7-24-2022,
10 seeds--7 g 10 d, 3 g 14 d, finish. = 100%
2.) Ghost pepper - test starts 7-24-2022, 20 seeds -- 10 g 18
d, 6 g 24 d, finish. = 80%
What that means, is on cotton
ball #1 on 7-24-11 you put 10 seeds of Anaheim and 7 seeds germinated
10 days later, then three more on the 14th day, then the test
was finished, and you had 100% germination.
The on cotton ball #2, you put
20 seeds on the cotton on July 24th, and then counted the seedlings
on the 18th and 24th days, and ended with 80% germination.
The bowl and plate should be put
up somewhere in a heated room up high where the temp. durting
the day may reach 80-85%, like on top of a book case, on top of
a refrigerator, etc.
Always remove seedlings from the
cotton as you count them. When you count the germinated seedlings,
carefully use your tweezers, and pull off those seedlings as you
count them, and you could plant them in pots if you wish.
DRYING PEPPERS
to preserve their heat levels
Using fresh ripe orange habaneros
from the grocery store, Jeff Woodcock of Pennsylvania measured
the results of different drying temperatures:
Always use fully ripe peppers
for drying, as green peppers or immature peppers do not dry well.
Cut the peppers lengthwise. You can air dry them in the sun, use
a food dehyrdator, or in the oven set at low heat. You can dry
peppers to leather-dry (fruit still bendable), or "cracker-dry"
(breaks into flakes when bent).
In all cases, 8-9 pounds of
fresh habanero peppers produced one pound of dried peppers.
The following information
is the results of drying the habaneros to cracker-dry stage.
Using the food dehydrator at
110 deg. F., it took 26 hours for fresh habaneros to dry, and
the dried pepper heat level were increased 7X from their fresh
level, but the peppers lost 13% of its total heat levles when
compared to the fresh pepper levels.
The oven set at 170 deg. F.,
the heat level of the dried peppers increased 6X from the fresh
level, but the additional heat caused the peppers to lose 23%
of their total heat when compared to the fhesh pepper levels.
Time to cracker-dry was 8.5 hours.
The oven set at 200 deg. F.,
the heat levels of the dried peppers increased 5.6X from the fresh
level, but lost 40% of their total heat, and the sugars in the
pepper was starting to turn brown. The time to cracker-dry was
not much faster than 170 deg. F., in 8.0 hours, but the fruit
lost nearly half of their total heat, and changed their color
and ultimately their flavor.
REMEMBER--All peppers are perennials, and
make nice house-plants if grown in potting soil in 2-3 gallon
plastic pots, and taken indoors when the nights drop into the
40s.
Move plants
outdoors when nights go back
into the 50s and keep growing them in their containers. Plants
will live for several years that way, most will stop growing in
the winter and drop most of their leaves, but will leaf back out
in spring.
Get a printed copy of our seed catalog in the mail
here.
AND>>>Visit the On-line pepper seeds for sale list here.
Updated December 11,
2022